
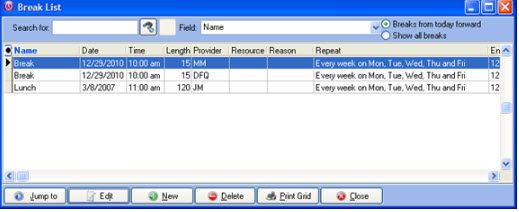
– The Break List can be accessed by clicking the Lists menu and Break List.
If you have previously set up any breaks using the Break List, you will see those breaks listed on the screen.
– Click New. You will see the New Break Entry window.
– Fill in the fields with the following information:
Name: If this break was the lunch break for a specific doctor, you would want to specify that information in the name of the break. Make the name as descriptive as possible, in order to avoid confusion when looking at the schedule.
Date and Time: Similar to the Template setup, the Date and Time fields contain the STARTING dates and times for what is being scheduled.
Length: The Length field should contain the number of minutes you would like to schedule for the break. This number should be an interval that corresponds with the scheduling intervals set in the Program Options.
Repeat: Most breaks are going to be regularly occurring breaks. For this reason, you would want to set up most of your breaks as repeating breaks. Refer to the Repeating Appointment Handout for more information on how to configure the Repeating settings.
Color: This field will let you specify what color you want this break to display on the schedule. This field will default to the value set in Program Options.
All Columns: Office Hours and Office Hours Professional allow you to set up multiple columns for individual providers. This allows you to double-book time slots. Most breaks would prevent the doctor from seeing ANY patients. For this reason, you would want to place a check mark in this field.
Providers: Any break can be configured for either specific providers, or all providers. Unless your doctors will all be following the exact same schedule, it is generally recommended that you set up individual breaks for each provider.
Resource: You can schedule breaks for resources. However, it is not necessary to do so, since the use of the resource will generally require the presence of a provider. If you want to make sure that the break time is set aside for the resource as well, you can do so.
– Once you have made you selections on this screen, click Save. If you selected the option to schedule the break for some providers, you will see the following screen:
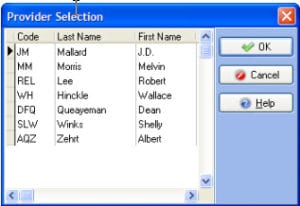
– Click on the provider names of the providers that will be utilizing this break. It is not necessary to hold down the [CTRL] button. Once finished, click OK.
– Your break will now appear on your Break List. Notice that if multiple providers were selected, the same break will appear in the list multiple times. It will appear once for each provider.
– Repeat this process until all desired breaks are scheduled.

Recent Comments