
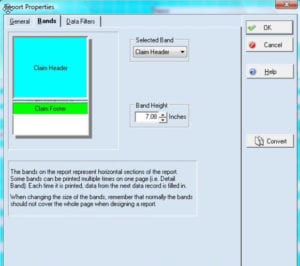
Claim Header Band – Includes all information from the top of the CMS form down to box 21 and 23
Transaction Header Band – Not Used
Transaction Detail Band – Includes all fields in box 24
Claim Footer Band – Includes everything below the last line of box 24
Take the following steps to align your CMS 1500 claim forms:
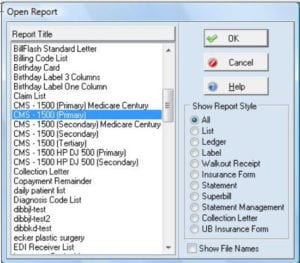
1. Click Reports and select Design Custom Reports and Bills.
2. When the Report Designer opens, click File and select Open Report
3. Select the report used for paper claims and click OK. In this example, it is CMS-1500 (Primary).
4. The CMS 1500 form will open in Report Designer.

5. From within Report Designer, click File and select Report Properties.
6. The Report Properties window opens to the General tab. Adjust the form from the Form Offset field.
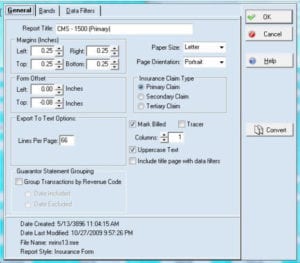
Effect of form offset field entries
– If you put a positive number in the left offset, the whole form will move to the right
– If you put a negative number in the left offset, the whole form will move to the left
– If you put a positive number in the top offset, the whole form will move down
– If you put a negative number in the top offset, the whole form will move up
When the form offset is correct Once the form offset setting is correct, alignment may be improved, by increasing or decreasing the size of the bands located in the Bands tab. Each band contains a different set of information. Band one (blue header band) on the standard CMS-1500 insurance claim form format contains all of the information from the insurance company area at the top of the form through box 23. Band two is not used. Band three (detail, just above the green band) contains the transaction lines in box 24. Band four (green footer band) contains the information for boxes 25 through 33.
Guidelines for Changing Band Size
Increasing the height of the Claim Header Band moves all other bands down the page, while decreasing the height of the Claim Header Band moves all the other bands up.
Important: DO NOT change the height of the Transaction Detail Band.
On the standard CMS-1500 format, the Transaction Header Band is not used.
Increasing the height of the Claim Footer Band moves The Claim Footer Band up, while decreasing the height of the Claim Footer Band moves the Claim Footer Band down. This is because the size of the Claim Footer Band is measured from the bottom of the page, rather than from the top of the page like the previous three bands.
Be careful when changing the height of any band so that you do not cover up the data fields. The key to this process is trial and error. If you change the size of a band and its fields move too high, try decreasing the size of the band or increasing the size by a smaller number. When aligning a form to your printer, plan on using quite a number of forms.
Additional Alignment
If there are still fields out of alignment, the next step is to individually move the misaligned fields. Select the field that is out of alignment by clicking on the field once with your mouse. Next, place the mouse pointer on the selected field, then click and hold the mouse button
down, dragging (moving) the mouse to the right or left, up or down.
For refined movement increments, select the field that is out of alignment by clicking the field once, and then use the arrow keys on the keyboard to move it right, left, up, or down. Each press of an arrow key moves the selected field 1/72 of an inch. Again, the key to this process is trial and error. Continue to change the settings and reprint the form until the alignment is satisfactory.
Test Printing
It is not necessary to close the Report Designer to print or display a sample claim if there is a printable claim in Claim Management.
- Click on Activities and select Claim Management from the Medisoft menu.
- Select a claim with a Ready to Send status and click Print/Send.
- In the Print/Send window, select Paper and click OK.
- Select the form that you adjusted in the steps above and click OK.
- In the Print Report Where window, select Preview the report on the screen and click Start.
- Click OK in the Data Select Questions window.
- The claim will open in the Preview Report window, allowing you to determine if the fields need additional adjustments.

Recent Comments