
Our Blog
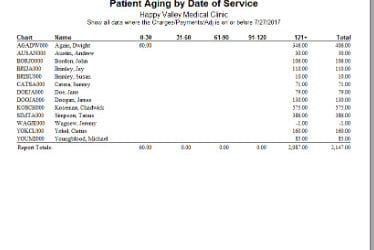
Patient Aging Report
Step 1: Go to Reports Step 2: Click Medisoft Reports Step 3: Select Aging Power Pack Step 4: Select an Aging Report that you need to print. Step 5: Click OK after you enter specific information of the Aging...
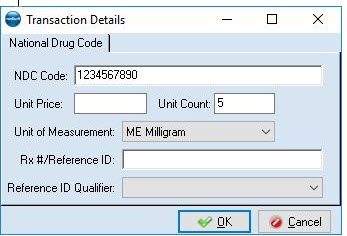
NDC Number Not Appearing on Claim
Problem 1: The NDC number may be in the procedure information, but not attached to the charge. If the NDC number is in the procedure settings when the charge is created, it should be copied into the charge details. If the NDC number is added or changed in the...
Medisoft NPI
Medisoft uses four types of NPI numbers: * Assigned Provider NPI - Provider that renders services to the patient o Click Lists, Provider, Providers, Edit the referring provider, click the Default PINs tab, and enter the referring provider's number in the...
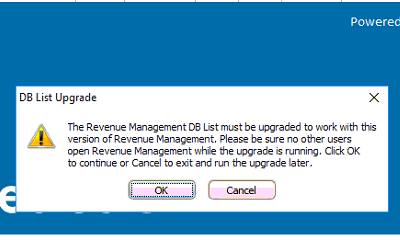
DB List Upgrade
If you see this message when opening the Revenue Management Just click OK Next Click Yes Click OK Click No and the Revenue Management will show up
Schedule Will Not Print from Office Hours
Problem: The "Printing Progress" bar appears when trying to print the schedule from Office Hours for a certain day, but the progress bar never advances. Medisoft resumes when print job is canceled, but users are not able to print the schedule report. Solution:...
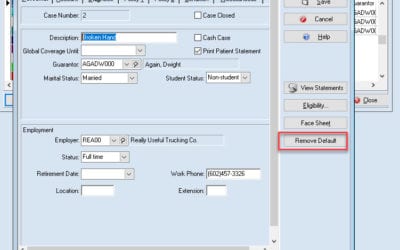
Wrong info on new case
Problem: When creating a new case, patient, or other new entry, a different patient's information appears. This may include the guarantor, employer, policy information, etc. Solution 1: This problem is often caused by a default that was accidentally set. See our...
For Developers
Exporting Reports
Run the report. When it is finished, click the print icon in the top left of the window Check the box next to Print to File Select the type of file you would like export to in the Type box (for example Excell or CSV file) Click the ellipsis icon...
How to Fix when Inside and Outside Lab Charges Are not Printing On Statements.
If you notice in all your inside and outside lab charges are not printing, it's because there's a problem with the program you have to check the box to get them to print so if you're in your procedure code list. Find your inside lab charge or outside lab charge...
For IT
Exporting Reports
Run the report. When it is finished, click the print icon in the top left of the window Check the box next to Print to File Select the type of file you would like export to in the Type box (for example Excell or CSV file) Click the ellipsis icon...
How to Fix when Inside and Outside Lab Charges Are not Printing On Statements.
If you notice in all your inside and outside lab charges are not printing, it's because there's a problem with the program you have to check the box to get them to print so if you're in your procedure code list. Find your inside lab charge or outside lab charge...
